One of our neighbors has an elderly dog who has trouble climbing up and down their back steps leading to the yard . She asked me to design a special ramp for him, and I just installed it today.
Measuring approximately 3' X 5', I constructed this out of plywood and used 2 X 4's on the base. I encased the top layer of wood with indoor/outdoor carpeting to give the old boy some traction, and I added horizontal strips of wood to help him on the incline.
If your dog has a hard time walking, is recovering from any kind of leg surgery or has hip dysplasia, this is extremely helpful. I can do custom orders.
Showing posts with label plywood. Show all posts
Showing posts with label plywood. Show all posts
Friday, October 7, 2011
Monday, October 3, 2011
Building a Hinged Storage Ottoman
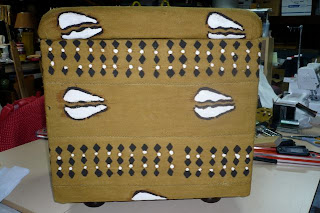
My wife asked me if I could construct an ottoman out of African mud cloth for her business (Threads of Change). I decided to make one that served two purposes, one that would be an eye-catching piece of home decor but also serve as a storage trunk. The finished piece ended up measuring 16 1/2" (width) x 20 1/2" (length) X 21" (height), but you can customize this to any measurements.
I started off constructing the base from 5 pieces of store-bought 1/2" plywood, which I constructed into a box. I painted the box white.
I then machine stapled standard (thick) batting to all exterior sides. This gives the ottoman a soft feel and it provides a cushion for the fabric, especially along the edges which can cause wear and tear from underneath.
To upholster the box, I measured the circumference of the box with a measuring tape, added 1", and cut one length-wise piece of mud cloth fabric using that measurement (in this case, 16-1/2" + 20-1/2" +16-1/2" + 20-1/2" + 1" = 75"). I had my wife sew a seam, joining the two raw edges with 1/2" seam allowance. We now had a circular slip cover. I slipped this over over and around the box, taking care to line the seam up right on top of one of the back edges. I then machine-stapled the mudcloth to the top and bottom rims.
I added a piece of black broadcloth underneath, to hide the raw edges and the wood.
Next, I moved on to the lid (top) of the ottoman. I machine-stapled batting to the top of the lid, and then I added a very thick piece of foam, which I bought at Joann Fabrics. (I bought a large piece of foam and then cut it to size.)
I spraymounted the foam piece to the top of the lid, on top of the batting.
To upholster, I cut an oversize piece of mud cloth, folded the edges underneath, and covered it over and around the top, stapling the fabric in place underneath the lid. I covered the underside of the lid with black fabric.
I then screwed in a set of brass hinges and attached the top lid to the box.
Finally, I added (screwed in) four wooded feet to the bottom of the piece.
There you have it. You can can see the finished product on my wife's Etsy shop:
Threads of Change
Labels:
african mud cloth,
brass hinges,
ottoman,
plywood,
storage,
Threads of Change,
trunk
Monday, March 1, 2010
Rebuilding a piece with multiple types of wood


This piece was a real project. In one of its past lives it had been painted completely white. Later, when it was stripped and stained, because the majority of the wood had deep grain lines in it, and the white paint was lodged so deep in these lines, that instead of taking the trouble to remove all the paint, the option was to use dark stains to cover up what paint was left.
I usually start by turning a piece upside down. That way, I can see what the underbelly of "the beast" really looks like. In this case, it seems it had been rebuilt at least once, if not more. The back was plywood and the pieces inside the seating part were veneer.

Back of the desk before
The trick to getting the left-over paint out was patience and a lot of sanding. I started with a mouse sander and 120 sandpaper, then worked my way through the 180, 220, 320, all by hand. The top was rough and it took some time to get a smooth finish down.

Back of the desk after
As I stripped and sanded, I saw different colored woods emerge, and I wanted to bring these colors out. I used Colonial Maple and Natural stains for the bulk of the piece, and I used a Red Mahogany and Dark Walnut as accent stains. Patience applied here as well.
Two coats of poly, some Brasso for the pulls, and the piece cleaned up nicely.

The desk after multiple rounds of sanding

Drawers after

Top view of drawers after staining and sanding
Labels:
Colonial Maple and Natural,
plywood,
staining,
stripping,
veneer
Subscribe to:
Posts (Atom)


